Flask by example (How to build an online polling app)
Welcome everyone!, This is the beginning of a new series where we’ll learn how to use flask by building a simple Online polling application.
This series is going to be split into several parts because of the size of the app we’re building. At the end of this series we’ll have built a polling app, with the following features:
- A basic authentication system.
- Ability to vote on various topics
- Interactive progress bars to show the percentage of votes
We’re going to use Flask as our backend, Bootstrap3 for our layout and basic styling and ReactJS to enhance our UI and make it more interactive.
Our polling app is going to be called Votr
Why flask?
Quoting the flask docs
Flask is a microframework for Python based on Werkzeug, Jinja 2 and good intentions
Most people are quick to dismiss microframeworks like flask as not being powerful compared to django or other batteries included web frameworks which isn’t correct. so what does micro mean?
Micro means that the framework was designed to be as minimal as possible and just do what a basic web framework should do, while being extensible without making assumptions and including features that may not be used by everyone. Now What does this mean to you as a developer?, it means that you can build your web app from scratch and then as your need more features for your app you can simply install the required libraries and plugins you need (You can even roll out a new flask plugin and share it with the world if you’re feeling adventrous ).
At the end of the day you’ll get a better understanding of how different parts of your web app ticks because you actually added those ‘parts’ yourself (get it? web development one drop at a time). instead of using a web framework for over a year only for you to discover that feature x existed like 2 years earlier! and you’ve been doing things the hard way.
So if you’re a newbie in building web apps with python and you’ve been frustrated by django, I’ll recommend you stick with flask, and then when you’re comfortable with it, you can move on to django or another full featured framework. Using flask will help you understand most of the design decision and approaches django uses.
Goals of this tutorial
I created this tutorial for those (Python programmers and others coming from other languages) who have tried out web development with Django and found it too confusing and difficult to grasp.
It’s also for those who’ve heard about how simple and straight forward flask is, followed the official docs, but don’t know how to do something real with it.
At the end of this tutorial, You would have:
- Built a REST API with flask
- Gotten a basic understanding of python's premier ORM SQLAlchemy
- Leveraged the power of some popular flask extensions like Flask SQLAlchemy, Flask Migrate and Flask-Admin
- Learned how to Build interactive and dynamic UI's with ReactJS
- How to structure your flask applications and use Flask Blueprints
- Learnt how to run background jobs with Celery
Here is a screenshot of the online polling app you will build.
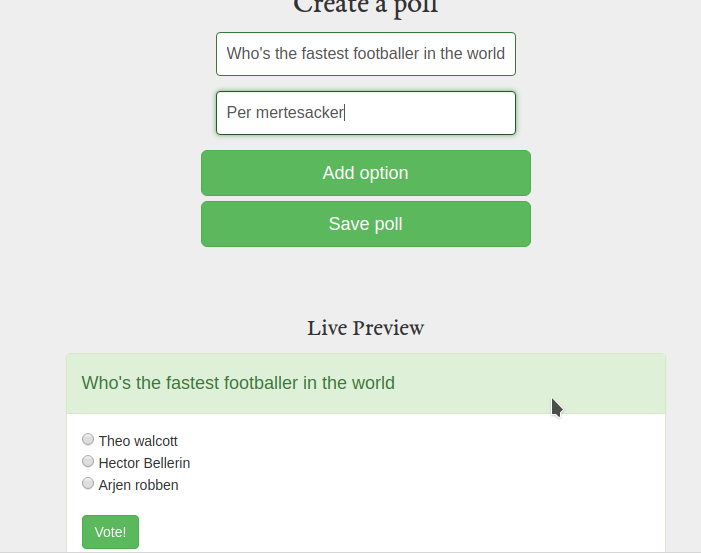
and a gif showing the voting process
Requirements and setup
To follow this tutorial effectively you should have the following installed:
I’ll also assume you have basic knowledge of html and css and that you’re running Linux (what have you been doing with your life if you aren’t).
Also when i refer to Linux I’m referring to Ubuntu or some other Ubuntu based distro like Linux mint or elementary. User’s of other distro’s should be able to follow along without any problems because most of the libraries you’d be installing would be done with pip. Everything should also work on windows, if you know your way around, but if you’re stuck with something on windows, please feel free to drop a comment or google your way out of it if you’re ashamed of yourself and feel it’s too basic :).
If you’re on Linux, you should have python and pip installed installed by default in your distro. On windows make sure you download the python3 exe from python.org and tick the option to add python to your path.
Lastly you should have basic knowledge of the Python programming language.
Now we’re going to install virtualenv and create a new virtual environment where our project and all it’s files and dependencies will reside.
Installing virtualenv
Install virtualenv with pip.
$ sudo pip install virtualenvCreate a new virtualenv with python3 and activate it, (you can skip the -p python3 part if you’re on windows and you installed python3)
$ virtualenv -p python3 votrActivate the virtualenv
$ cd votr
$ source bin/activate
Your new virtualenv is now installed and activated you should see something like this in your terminal prompt
(votr) [user@hostname votr]$Finally we’re going to install flask
$ pip install flaskEverything starts with hello world!
We’re going to write a basic flask app that returns ‘hello world’ when we navigate to / in our browser
Create the project folder and votr.py
$ mkdir votr
$ cd votr
$ touch votr.py
That will create a new directory called votr and a file named votr.py
Open votr.py with favourite text editor and include the following
from flask import Flask

votr = Flask(__name__)

@votr.route('/')
def home():
    return 'hello world'

if __name__ == '__main__':
    votr.run()
Run it from the terminal with:
$ python3 votr.pyBy default flask runs on port 5000 so open any browser you have an enter the address localhost:5000 and sure enough hello world should be displayed.
That’s it! our development environment is all setup with flask installed.
To keep this simple, and to show you beauty of developing flask applications, we’ll install various extensions as we need them, so you’ll understand what each library does and how handle the quirks and issues that may arise when we get there.
If you have any questions or issues with the installation process. please leave a comment below else I’ll see you in the next part.
The repo for this project can be found on github