Flask by example 6 (Connecting React to a REST API)
In this part, we’re going to be connecting our React front-end with the REST api we created previously, basically we’ll make a request to the server and then our api responds with a json result, and then we use the received data to update the DOM if the request was successful or tell the user that something went wrong.
Preparation
Before we get on to displaying the polls, we’re going to make some important changes to our application.
First, we’re going to get rid of the div form_container in polls.html file and replace it with a div that has an id of container we are also going to change the id of the latest_polls div in our index.html file to container. we’re doing this so our react componenets have a universal container where they can be rendered into.
You might find yourself in a situation where you need to render different components into different containers in your templates (You’ll mostly do this if you’re re-writing some parts of an existing application in React), you can easily create a separate js/jsx file for your component(s) and specify where they should be rendered with ReactDOM.render
I also made some improvements to the CSS and html of the application, so please make sure you check out the Github repo to get the latest html layout and css styles before proceeding.
You’ll also need another React addon called React Router to help us render the right component for the right route (Remember react only handles the view for us….nothing more). It’s available on npmcdn Just include it at the top of index.html and polls.html
<script src="https://npmcdn.com/react-router@2.8.1/umd/ReactRouter.min.js"></script>Saving the polls
First off all, we’re going make sure our users polls are persisted to the database, when the user clicks on save poll, we want to extract the relevant data, make an ajax post request to the server, get and display the result of the request (success or failure) as a good old javascript alert.
This code goes into the handleSubmit method of the PollForm component
//global variable to store origin url (e.g http://localhost:5000)
var origin = window.location.origin;


handleSubmit: function(e){
    e.preventDefault();
    var title = this.state.title;
    var options = this.state.options;

    var data = {'title': title, options: options.map(function(x){return x.name})};
    var url =  origin + '/api/polls'

    // make post request
    $.ajax({
      url: url,
      dataType: 'json',
      type: 'POST',
      data: JSON.stringify(data),
      contentType: 'application/json; charset=utf-8',
      success: function(data){
        alert(data.message);
      }.bind(this),
      error: function(xhr, status, err){
        alert('Poll creation failed: ' + err.toString());
      }.bind(this)
    });
  },
We created a global variable origin to hold the base address of the route and then used it to form the api route, after that we made a post request to our api using JQuery (You could use pure javascript if you want) and on success or failure we simply alert the user and tell them what happened.
We are also going to change the button type of the Add option button to "button". this was done to prevent the button from triggering the submit event which is default action triggered if we don’t specify the type of the button.
<div className="row form-group">
  <button className="btn btn-lg btn-success btn-block" type="button" onClick={this.handleOptionAdd}>Add option</button>
  <button className="btn btn-lg btn-success btn-block" type="submit">Save poll</button>
</div>
After doing this, you should be able to create your first poll as a user!
React router
Next up, we’re going to display the polls to logged in users on the homepage (only logged in users can vote). React Router helps us render the right component based on the page we’re on.
Include the Relevant imports at the top of the polls.js file
Note that we’re using version 2 of React router which is quite different from version4 at the time i made this tutorial
var Router = ReactRouter.Router;
var Route = ReactRouter.Route;
var browserHistory = ReactRouter.browserHistory;
and change the ReactDOM.render method to this
ReactDOM.render((
  <Router history={browserHistory}>
    <Route path="/polls" component={PollForm} />

  </Router>

  ),
  document.getElementById('container')
);
The new ReactDOM.render method is pretty straight forward, we’re simply telling React that when the user visits the /polls suburl it should render the PollForm component into our container div.
If you’re wondering what browserHistory means, There’s a detailed example on browserHistory and other “histories” provided by react router.
Displaying the polls on the homepage
To display the polls we’re going to create two new react components (to manage state properly).
These components would work together to Load polls from the server and on each vote, increment the vote counter for a poll and refresh the UI (by fetching polls from the server again and calling setState).
var LivePreviewProps = React.createClass({

  voteHandler: function(data){

    var url =  origin + '/api/poll/vote'

    // make patch request
    $.ajax({
      url: url,
      dataType: 'json',
      type: 'PATCH',
      data: JSON.stringify(data),
      contentType: 'application/json; charset=utf-8',
      success: function(data){
        alert(data.message);
        this.setState({selected_option: ''});
        this.props.loadPollsFromServer();
      }.bind(this),
      error: function(xhr, status, err){
        alert('Poll creation failed: ' + err.toString());
      }.bind(this)
    });

  },


  render: function(){
    var polls = this.props.polls.Polls.map(function(poll){
      return (
        <LivePreview key={poll.title} title={poll.title} options={poll.options}
        total_vote_count={poll.total_vote_count} voteHandler={this.voteHandler}
        classContext={this.props.classContext} />

    );
  }.bind(this));

    return (
      <div>
        <h1 style={Align}>{this.props.header}</h1>

        <br />
        <div className="row">{polls}</div>

      </div>

    );
  }
});
Create another component AllPolls that loads the polls from the server
var AllPolls = React.createClass({

  getInitialState: function(){
    return {polls: {'Polls': []}, header: '', classContext: ''};
  },

  loadPollsFromServer: function(){

    var url =  origin + '/api/polls'
    this.setState({header: 'Latest polls', classContext: 'col-sm-6'})

    //make get request
    $.ajax({
      url: url,
      dataType: 'json',
      cache: false,
      success: function(data) {
        this.setState({polls: data});
      }.bind(this),
      error: function(xhr, status, err) {
        console.error(url, status, err.toString());
      }.bind(this)
    });
  },

  componentDidMount: function(){
    this.loadPollsFromServer()
  },

  render: function(){
    <LivePreviewProps polls={this.state.polls} loadPollsFromServer={this.loadPollsFromServer}
    header={this.state.header} classContext={this.state.classContext} />

  }

});
Your ReactDOM.render method should include a new route to the homepage that invokes the new AllPolls component
ReactDOM.render((
  <Router history={browserHistory}>
    <Route path="/" component={AllPolls} />

    <Route path="/polls" component={PollForm} />
  </Router>

  ),
  document.getElementById('container')
);
Passing methods as props
The unique thing is how we handle the state of the polls here in AllPolls
<LivePreviewProps polls={this.state.polls} loadPollsFromServer={this.loadPollsFromServer}
header={this.state.header} classContext={this.state.classContext} />
and here in LivePreviewProps
<LivePreview key={poll.title} title={poll.title} options={poll.options}
total_vote_count={poll.total_vote_count} voteHandler={this.voteHandler}
classContext={this.props.classContext} />
We’re passing in the loadPollsFromServer method as a prop to the LivePreviewProps component.
The LivePreviewProps component also passes it’s voteHandler method as a prop to LivePreview component which it uses to handle votes calling this.props.voteHandler()
the voteHandler method in LivePreviewProps then processes the votes
and refreshes the UI by calling the prop that was passed to it using this.props.loadPollsFromServer() which eventually fetches the polls from the database and updates the UI accordingly.
React allows you to pass in methods as props to child components and then in the child component you can use those props as callbacks for various events.
This is a simple way to emulate two way data-binding (Data flowing seamlessly between parent and child) in react Technically it’s not but it enables data to flow from parent to child and vice versa.
classContext is a state variable we use to set the bootstrap class of the LivePreview component based on where it is rendered
You should be able to see the list of all the previous polls you created as LivePreview components, but if you click on the vote button it wouldn’t do anything now because we haven’t implemented the voteHandler method of the LivePreview component.
To do that we’re going to define some states in LivePreview to keep track of the selected option and another to control the activeness of the button (the button should be disabled after a user casts their vote). We’re also adding a new method voteHandler that would be triggered anytime the vote button is clicked (When the form is submitted)
var LivePreview = React.createClass({

  getInitialState: function(){
    return {selected_option: '', disabled: 0};
  },

  handleOptionChange: function(e){
    this.setState({selected_option: e.target.value });
  },


  voteHandler: function(e){
    e.preventDefault();

    // build the json data
    var data = {"poll_title": this.props.title, "option": this.state.selected_option};

    //calls props handler
    this.props.voteHandler(data);

    //disable the button
    this.setState({disabled: 1});

  },

  render: function(){

    var options = this.props.options.map(function(option){

      if(option.name) {
        return (
          <div key={option.name}>
            <input name="options" type="radio" value={option.name} onChange={this.handleOptionChange} /> {option.name}
            <br />
          </div>

        );
      }
    }.bind(this));

    return(
      <div className="panel panel-success">
        <div className="panel-heading">
          <h4>{this.props.title}</h4>

        </div>

        <div className="panel-body">
          <form onSubmit={this.voteHandler}>
            {options}
            <br />
            <button type="submit" disabled={this.state.disabled} className="btn btn-success btn-outline hvr-grow">Vote!</button> <small>{this.props.total_vote_count} votes so far</small>
          </form>

        </div>

      </div>

    )
  }
});
Your polls should like this now:
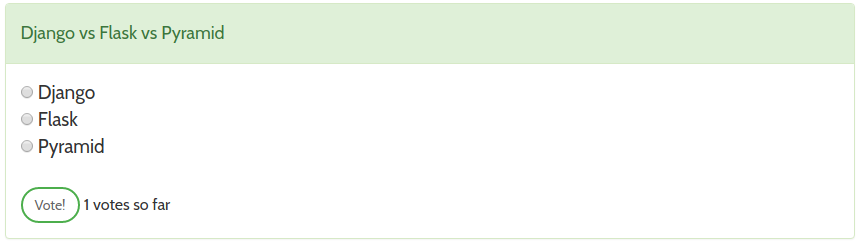
Cool! But we don’t have progress bars to show who’s leading the polls and the exact percentage by which they’re leading.
To achieve that we’re going to use bootstrap3 progress bars, HTML 5 also has progress bars but the bootstrap progress bars have already been styled for us and they also provide a nice animation when they’re updated (it’s almost like it was built with react in mind). Thanks bootstrap!
render: function(){
  var options = this.props.options.map(function(option){

    if(option.name) {

      // calculate progress bar percentage
      var progress = Math.round((option.vote_count / this.props.total_vote_count) * 100) || 0
      var current = {width: progress+"%"}

      return (
        <div key={option.name}>
          <input name="options" type="radio" value={option.name} onChange={this.handleOptionChange} /> {option.name}

          <div className="progress">
            <div className="progress-bar progress-bar-success" role="progressbar" aria-valuenow={progress}
            aria-valuemin="0" aria-valuemax="100" style={current}>
              {progress}%
            </div>

          </div>

        </div>

      );
    }
  }.bind(this));
Pretty straight-forward math. Now we have a progress bar that shows us the percentage of votes each option has. The progress bar percentage and the total vote count should update as soon as you cast your vote on any poll.
Permalinks for polls
Until now, we’ve fetched all the from the database and displayed them on the homepage, that works perfectly. But this is not really ideal because what we really want is to have a link to a single poll. we can then share this links with our friends so they can also cast their votes.
Without this, they’ll have to sift through all the polls on the homepage before they can find the poll they’re looking for.
Lets create two new routes in votr.py
@votr.route('/polls/<poll_name>')
def poll(poll_name):

    return render_template('index.html')

@votr.route('/api/poll/<poll_name>')
def api_poll(poll_name):
    poll = Topics.query.filter(Topics.title.like(poll_name)).first()

    return jsonify({'Polls': [poll.to_json()]}) if poll else jsonify({'message': 'poll not found'})
The first route accepts an arbitrary named url parameter <poll_name> and returns the index.html template back
The second one is an api endpoint that uses the <poll_name> to search the db for a particular poll and returns the result as json if the poll was found, else it returns a message back.
Go back to the polls.js file and add a new React Router route
ReactDOM.render((
  <Router history={browserHistory}>
    <Route path="/" component={AllPolls} />

    <Route path="/polls" component={PollForm} />

    <Route path="/polls/:pollName" component={AllPolls} />

  </Router>

  ),
  document.getElementById('container')
);
The new route <Route path="/polls/:pollName" component={AllPolls} /> is basically the same as it’s flask counterpart with an arbitrary value for :pollName for the poll name
We’re also re-using the AllPolls component, which means we’ll have to make it smart enough to know which Route called it. Luckily that information is available to us as a prop.
In this case this.props.routeParams.pollName
Update the AllPolls component
var AllPolls = React.createClass({

  getInitialState: function(){
    return {polls: {'Polls': []}, header: '', classContext: ''};
  },

  loadPollsFromServer: function(){

    // pollName is available as a prop
    var pollName = this.props.routeParams.pollName

    if(pollName){
        var url = origin + '/api/poll/' + pollName
        this.setState({classContext: 'col-sm-6 col-sm-offset-3'})

    } else {
        var url = origin + '/api/polls'
        this.setState({header: 'Latest polls', classContext: 'col-sm-6'})
    }

    //make get request
    $.ajax({
      url: url,
      dataType: 'json',
      cache: false,
      success: function(data) {
        this.setState({polls: data});
      }.bind(this),
      error: function(xhr, status, err) {
        console.error(url, status, err.toString());
      }.bind(this)
    });
  },

  componentDidMount: function(){
    this.loadPollsFromServer()
  },

  render: function(){

    // if a message was returned in the json result (the poll wasn't found)
    if(!this.state.polls.message){

    return (
      <LivePreviewProps polls={this.state.polls} loadPollsFromServer={this.loadPollsFromServer}
      header={this.state.header} classContext={this.state.classContext} />

      );
    } else {
      return (
          <div style={Align}>
            <h1>Poll not found</h1>

            <p>You might be interested in these <a href="/">polls</a></p>
          </div>

        )
      }
    }
  });
We simply checked if the pollName was set in the url and based on that we set the url that we want to query (and the style and header content we want to show).
We also modified the render method to display a message to the user if they requested for a poll that didn’t exist in the database
The AllPolls component is now flexible enough to fetch all the polls or a single poll depending on how it was invoked.
Extra tweaks
Let’s make the homepage display two polls on each row, and the permalink page display one poll.
We already planned this ahead with the classContext variable from AllPolls, all we need to do is to use it as a div surrounding the panel panel-success div.
Change the return value of LivePreview’s render method to this.
return(

  <div className={this.props.classContext}>
    <div className="panel panel-success">
      <div className="panel-heading">
        <h4>{this.props.title}</h4>

      </div>

      <div className="panel-body">
        <form onSubmit={this.voteHandler}>
          {options}
          <br />
          <button type="submit" disabled={this.state.disabled} className="btn btn-success btn-outline hvr-grow">Vote!</button> <small>{this.props.total_vote_count} votes so far</small>
        </form>

      </div>

    </div>

  </div>
)
also change the render method of PollForm to this (to center the LivePreview form on the create polls page)
render: function(){

  var classContext = "col-sm-6 col-sm-offset-3"

  return (
      <div>
        <form id="poll_form" className="form-signin" onSubmit={this.handleSubmit}>
          <h2 className="form-signin-heading" style={Align}>Create a poll</h2>


          <div className="form-group has-success">
            <label htmlFor="title" className="sr-only">Title</label>

            <input type="text" id="title" name="title" className="form-control" placeholder="Title" onChange={this.handleTitleChange} required autoFocus />
          </div>


          <div className="form-group has-success">
            <label htmlFor="option" className="sr-only">Option</label>

            <input list="option" className="form-control" placeholder="Option" onChange={this.handleOptionChange}
            value={this.state.option ? this.state.option: ''} autoFocus />
          </div>


          <div className="row form-group">
            <button className="btn btn-lg btn-success btn-block" type="button" onClick={this.handleOptionAdd}>Add option</button>

            <button className="btn btn-lg btn-success btn-block" type="submit">Save poll</button>
          </div>
          <br />
        </form>

        <div className="row">
        <h3 style={Align}>Live Preview</h3>

          <LivePreview title={this.state.title} options={this.state.options} classContext={classContext} />

        </div>

      </div>

    );
  }
});
Reload the view and now you should see two polls on each row on the homepage, while the preview form on the create poll page should remain centered.
Now you should understand what classContext does for us if you did not before.
Improve the create poll form
Remember in the previous tutorial where we prevented duplicate options in our database by linking existing options with the poll, we’re going to do something similar on the front-end, but this time we’re going to show our users existing options as they type, so instead of typing the full name of an option they can easily see the results filtered out in real time as they type and then pick one from the list
Something along the lines of:
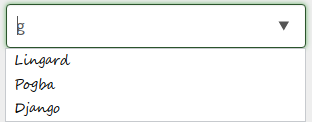
To do that, we’ll simply retrieve all the options form the api endpoint we created earlier ('/api/poll/options')
and Then edit the render method of the PollForm component to fetch those results and use them as the options of a new datalist element
This is our PollForm component in all it’s glory.
var PollForm = React.createClass({

  getInitialState: function(e){
    // set initial state of form inputs
    return {title: '', option: '', options: [], all_options: []}
  },

  handleTitleChange: function(e){
    //change title as the user types
    this.setState({title: e.target.value});
  },

  handleOptionChange: function(e){
    this.setState({option: e.target.value});
  },

  handleOptionAdd: function(e){
    //update poll options and reset options to an empty string
    this.setState({
    options: this.state.options.concat({name: this.state.option}),
    option: ''
    });
  },

  componentDidMount: function(){

    var url =  origin + '/api/polls/options'

    //get all options
    $.ajax({
      url: url,
      dataType: 'json',
      cache: false,
      success: function(data) {
        console.log(data);
        this.setState({all_options: data});
      }.bind(this),
      error: function(xhr, status, err) {
        console.error(url, status, err.toString());
      }.bind(this)
    });

  },

  handleSubmit: function(e){
    e.preventDefault();
    var title = this.state.title;
    var options = this.state.options;

    var data = {'title': title, options: options.map(function(x){return x.name})};
    var url =  origin + '/api/polls'

    // make post request
    $.ajax({
      url: url,
      dataType: 'json',
      type: 'POST',
      data: JSON.stringify(data),
      contentType: 'application/json; charset=utf-8',
      success: function(data){
        alert(data.message);
      }.bind(this),
      error: function(xhr, status, err){
        alert('Poll creation failed: ' + err.toString());
      }.bind(this)
    });
  },

  render: function(){

    var classContext = "col-sm-6 col-sm-offset-3"

    var all_options = this.state.all_options.map(function(option){
                        return(<option key={option.id} value={option.name} />)

                      });

    return (
    <div>
      <form id="poll_form" className="form-signin" onSubmit={this.handleSubmit}>
        <h2 className="form-signin-heading" style={Align}>Create a poll</h2>

        <div className="form-group has-success">
          <label htmlFor="title" className="sr-only">Title</label>

          <input type="text" id="title" name="title" className="form-control" placeholder="Title" onChange={this.handleTitleChange} required autoFocus />
        </div>


        <div className="form-group has-success">
          <label htmlFor="option" className="sr-only">Option</label>

          <input list="option" className="form-control" placeholder="Option" onChange={this.handleOptionChange}
          value={this.state.option ? this.state.option: ''} autoFocus />
        </div>


        <datalist id="option">
          {all_options}
        </datalist>


        <div className="row form-group">
          <button className="btn btn-lg btn-success btn-block" type="button" onClick={this.handleOptionAdd}>Add option</button>

          <button className="btn btn-lg btn-success btn-block" type="submit">Save poll</button>
        </div>
        <br />
      </form>


      <div className="row">
      <h3 style={Align}>Live Preview</h3>

        <LivePreview title={this.state.title} options={this.state.options} classContext={classContext} />

      </div>

    </div>

    );
  }
});
You’ve now added an autocomplete Text box, that assists the user by showing them pre-existing options as they type, though our backend already prevent duplicates, this is still a nice feature to have in our web application
One last thing is left for the homepage, we want to sort the polls in descending order and make sure we only display opened polls. Just change your query in api_polls to
polls = Topics.query.filter_by(status=1).join(Polls).order_by(Topics.id.desc()).all()Well that’s all for this part, Here’s a gif of me casting my vote on the Fastest player in the English premier league :)
Missing features and general advice
- Users have no profile page to manage the polls they've created
- Even though we disabled the vote button after voting, our users can still reload the page and vote on the same option again!
- As a little web app is still it's pretty efficient to fetch the whole options in our database with one single request, as your application grows this may become very inefficient as it would be pointless to load a whole lot of information that your user may not need, you'd also be putting a lot of stress on your database too.
imagine fectcing a huge list of 200k+ polls or options in one go. Your application would seem very slow to users with slow internet connections. To handle this:
- You might want want to limit the polls you display on the homepage and then update it as the user scrolls.
- For the options you can listen to the onChange event of the text field and use the current value to make a request to the server
The goal here is to make little requests as they're needed (returning relevant information the user is interested in) not a single expensive request that comes back with a lot of info that the user doesn't need.
Conclusion
Now our voting application is gradually coming to life, Users can create polls and other users can vote on them.
We also implemented interactive progress bars to show the users the standings of the each option in a poll.
We aren’t going to do a lot of “new” React stuff as we progress in this tutorial, but i hope you seen the beauty of React and have fallen in love with this amazing Javascript library.
React is way more powerful and flexible than what you’ve seen in this tutorial. This is just the tip of the ice-berg to what you can accomplish with React.
You should be strong enough to venture into the huge ecosystem of react tutorials and addons that awaits you.
What are we hacking at next?
In the next part, we’re also going to add more control to our application to keep track of Fraudulent and Overzealous users who most likely would want to vote on a poll more than once and stop them from doing that.
Finally i’ll show you how to quickly spin up an admin dashboard for your application to handle basic CRUD operations on your models with Flask-Admin and also how flask admin can be integrated with our existing auth system.
If you’re enjoyed this part, please drop a comment, I’d love it. You can consider sharing this post and following me on twitter
See you in the next part. Cheers!