Flask by example 9 (Running background tasks with celery)
What is celery?
Celery is an asynchronous task queue/job queue based on distributed message passing. It is focused on real-time operation, but supports scheduling as well.
There are three main components in celery
- The workers
- The brokers
- The task queue
Let’s think of our web application as a big hotel, at any point in time there are customers in the hotel. Those customers can place an order for food and refreshments from the hotel’s restaurant. Let’s also assume that we have only 3 cooks and numerous “room service staff”
Customer X calls the restaurant for rice, Y calls for salad and Z calls for a glass of orange juice (Which is relatively easy to prepare). These customers have created three Tasks with this and the cooks start preparing the food. One of the cooks (Worker) finishes his task (Obviously the glass of orange juice). The cook communicates to the room service staff that he’s done with the juice, who in turn communicates with customer Z via the desk phone (broker) that the juice is ready and asks if he can bring it to his room.
The cook then enters into an idle state and waits for the next order (Task) to come in.
The brokers job is simply to serve as a communication pipeline between the workers and the creator of the Task, in this case the broker is a combination of the “room service staff” and the phone line.
On a typical day, more than 3 customers might order for food at the same time, which exhausts the number of available hands to handle their requests, The cooks then execute the tasks in the order in which they came in. The cooks have a central computer where they can see all the orders of the customers, this is the Task queue. as each cook finishes his current task, he quickly picks the next available task from the queue. They all repeat this procedure until the queue is empty.
Tasks can also be scheduled to be executed at a particular time. For example, a customer might call the restaurant and tell them he wants a bottle of wine by 6:00pm. Celery also supports this and it’s exactly what we’re going to implement in this part of the series.
This is basically how celery works, registered tasks are enqueued, available workers then pick a task from the queue and execute it. When they’re through with the task, they send a signal (through the use of the broker) that the task has been completed. The result may also be returned or stored (if needed).
The explanation above is more of a process/set of rules, so it’s more appropriate to call celery a protocol not a software.
This same protocol can be implemented in pretty much any modern programming language today. node_celery is an example.
Installation
Celery can be installed from pip with:
pip install celerysame goes for rabbitmq
pip install rabbitmqCreating the celery object
Flask used to have an integration for celery, but from celery 3.0 that integration was no longer necessary.
Include this at the top of votr.py
import config
from celery import Celery


def make_celery(app):
    celery = Celery(app.import_name, broker=config.CELERY_BROKER)
    celery.conf.update(votr.config)
    TaskBase = celery.Task

    class ContextTask(TaskBase):
        abstract = True

        def __call__(self, *args, **kwargs):
            with app.app_context():
                return TaskBase.__call__(self, *args, **kwargs)
    celery.Task = ContextTask

    return celery

votr = Flask(__name__)

votr.register_blueprint(api)

# load config from the config file we created earlier
votr.config.from_object('config')

# create the database
db.init_app(votr)
db.create_all(app=votr)

migrate = Migrate(votr, db, render_as_batch=True)

# create celery object
celery = make_celery(votr)
What this code does is to subclass the Task class of celery and make each celery task aware of the application context in flask (i.e with app.app_context()).
Without this you’ll get an error that the application was not registered on the db or that you’re working outside of the application context.
Don’t forget to update the config.py file to include the new variable CELERY_BROKER
CELERY_BROKER = 'amqp://guest@localhost//'
Registering the Task(s)
Now lets create a new file called tasks.py to hold our celery tasks.
import sqlalchemy
from sqlalchemy.orm import sessionmaker
from models import Topics
import config
from votr import celery


def connect():
    """Connects to the database and return a session"""

    uri = config.SQLALCHEMY_DATABASE_URI

    # The return value of create_engine() is our connection object
    con = sqlalchemy.create_engine(uri)

    # create a Session
    Session = sessionmaker(bind=con)
    session = Session()

    return con, session

con, session = connect()


@celery.task
def close_poll(topic_id):
    topic = session.query(Topics).get(topic_id)
    topic.status = False
    session.commit()
Our task is very simple, it’s accepts a topic’s id, get’s the topic associated with that id and sets the status to False which closes it.
To make celery aware of this function as a task we have to decorate it with @celery.task.
The connect function uses plain SQLAlchemy to connect to the database and create a session for us. This is just one of the little things Flask-SQLAlchemy does for us behind the scenes.
running the task
Now at the point of creation of a poll, we want to dispatch the task to celery and tell it to run close_poll at a particular time we provide
Edit the api_polls method to look like this
@api.route('/polls', methods=['GET', 'POST'])
# retrieves/adds polls from/to the database
def api_polls():
    if request.method == 'POST':
        # get the poll and save it in the database
        poll = request.get_json()

        # simple validation to check if all values are properly set
        for key, value in poll.items():
            if not value:
                return jsonify({'message': 'value for {} is empty'.format(key)})

        title = poll['title']
        options_query = lambda option: Options.query.filter(Options.name.like(option))

        options = [Polls(option=Options(name=option))
                   if options_query(option).count() == 0
                   else Polls(option=options_query(option).first()) for option in poll['options']
                   ]

        new_topic = Topics(title=title, options=options)

        db.session.add(new_topic)
        db.session.commit()

        # run the task
        from tasks import close_poll

        eta = datetime.utcfromtimestamp(poll['close_date'])
        close_poll.apply_async((new_topic.id,), eta=eta)

        return jsonify({'message': 'Poll was created succesfully'})

    else:
        # it's a GET request, return dict representations of the API
        polls = Topics.query.filter_by(status=1).join(Polls).order_by(Topics.id.desc()).all()
        all_polls = {'Polls':  [poll.to_json() for poll in polls]}

        return jsonify(all_polls)
Just after the new poll has been created, we imported the close_poll function from tasks.py (To avoid circular imports) and then called it’s apply_async method while passing it the estimated time (as a datetime object) we want the task to execute as eta
eta is formed from a UTC timestamp that we’ve not passed in yet. we’ll add that in the next section
Adding a time picker to the react front-end
Since most polls are short-lived, they don’t last more than a few hours or days, it makes more sense to use a timepicker not a full blown calendar, so i decided to build one react-simple-time-picker.
It can be installed from npm but since we’re not using Node, i’ve created a bundle that can be included in the html file.
Download the bundle, include it alongside polls.js and also in polls.html with
<script src="{{ url_for('static', filename='js/bundle.js') }}"></script>Finally edit PollForm component in polls.js to use react-simple-time-picker. (Note that the unimportant methods have been cut away)
// top level import
try {
  var SimpleTimePicker = ReactSimpleTimePicker.SimpleTimePicker;
}catch(err){
  console.log(err);
}


var PollForm = React.createClass({

  getInitialState: function(e){
    // set initial state of form inputs

    // close poll in 24 hours by default
    var close_date = new Date();
    close_date.setHours(close_date.getHours() + 24);
    close_date = close_date.getTime() / 1000;


    return {title: '', option: '', options: [], close_date: close_date, all_options: []}
  },


  onDateChange: function(e){
    // convert date to UTC timestamp in seconds
    var close_date = e.getTime() / 1000

    this.setState({close_date: close_date})
  },

  handleSubmit: function(e){
    e.preventDefault();
    var title = this.state.title;
    var options = this.state.options;
    var close_date = this.state.close_date;

    var data = {title: title,
                options: options.map(function(x){return x.name}),
                close_date: close_date
              };

    var url =  origin + '/api/polls'

    // make post request
    $.ajax({
      url: url,
      dataType: 'json',
      type: 'POST',
      data: JSON.stringify(data),
      contentType: 'application/json; charset=utf-8',
      success: function(data){
        alert(data.message);
      }.bind(this),
      error: function(xhr, status, err){
        alert('Poll creation failed: ' + err.toString());
      }.bind(this)
    });
  },

  render: function(){

    var classContext = "col-sm-6 col-sm-offset-3"

    var all_options = this.state.all_options.map(function(option){
                        return(<option key={option.id} value={option.name} />)
                      });

    return (
    <div>
      <form id="poll_form" className="form-signin" onSubmit={this.handleSubmit}>
        <h2 className="form-signin-heading" style={Align}>Create a poll</h2>

        <div className="form-group has-success">
          <label htmlFor="title" className="sr-only">Title</label>

          <input type="text" id="title" name="title" className="form-control" placeholder="Title" onChange={this.handleTitleChange} required autoFocus />
        </div>

        <div className="form-group has-success">
          <label htmlFor="option" className="sr-only">Option</label>

          <input list="option" className="form-control" placeholder="Option" onChange={this.handleOptionChange}
          value={this.state.option ? this.state.option: ''} autoFocus />
        </div>

        <datalist id="option">
          {all_options}
        </datalist>


        <SimpleTimePicker days="7" onChange={this.onDateChange} />

        <br />

        <div className="row form-group">
          <button className="btn btn-lg btn-success btn-block" type="button" onClick={this.handleOptionAdd}>Add option</button>

          <button className="btn btn-lg btn-success btn-block" type="submit">Save poll</button>

        </div>

        <br />

      </form>

      <div className="row">
      <h3 style={Align}>Live Preview</h3>

        <LivePreview title={this.state.title} options={this.state.options} classContext={classContext} />

      </div>

    </div>

    );
  }
});
We imported the timepicker at the top of the file, we put it at the top of the file so we don’t get an exception when we try to use it a file that doesn’t have the included bundle
We also added a new state close_date to track the closing date of the poll, by default we will close each poll in 24 hours if the close date was not specified. we’re also converting the time to a utc timestamp expressed in seconds (e.getTime() / 1000). so we can easily use python’s datetime.utcfromtimestamp to convert it to a datetime object that celery’s apply_async method expects as the eta argument.
The Timepicker is really simple. we just declared it with:
<SimpleTimePicker days="7" onChange={this.onDateChange} />
and passed in the number of days we want by default and our method onDateChange as a prop called onChange which helps us to keep track of the time generated by react-simple-time-picker
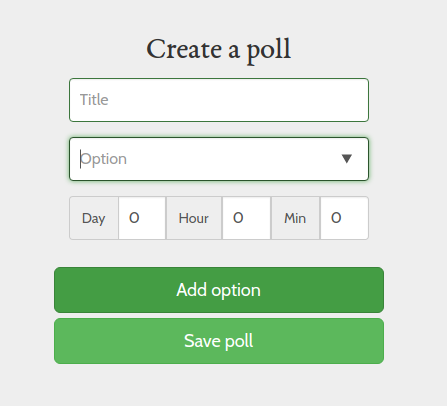
Your poll form should look like this now:
Finally we have to run celery, so it can accept and run the tasks
Open a new terminal and run celery with
celery -A tasks.celery worker --loglevel=info
Output
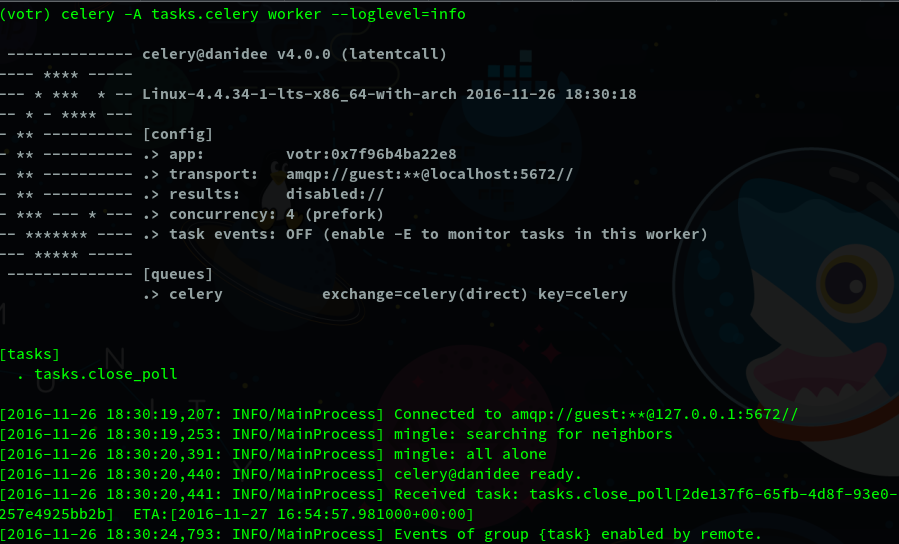
In the sample diagram, you can see that i already have a task running. by default, celery keeps unexecuted tasks in it’s queue even when it’s restarted. This means that tasks can survive a server reboot.
Also if a task’s eta has expired, celery would immediately execute the task(s) when it’s restarted.
Results are disabled, because we don’t care about the result of our task, we just want to close polls at a particular time.
Displaying the time left on a poll
It would be nice for our users to know how long a poll is active for before it gets closed. We should also be able to display the time to them in a nice format, such that they can either see the time left in days, hours or minutes depending on how much time is left.
To do that we’re going to add another field close_date to the Topics model and also modify it’s to_json method to return the new column to us.
class Topics(Base):
    title = db.Column(db.String(500))
    status = db.Column(db.Boolean, default=1)  # to mark poll as open or closed
    create_uid = db.Column(db.ForeignKey('users.id'))
    close_date = db.Column(db.DateTime)

    created_by = db.relationship('Users', foreign_keys=[create_uid],
                                 backref=db.backref('user_polls',
                                 lazy='dynamic'))

    # user friendly way to display the object
    def __repr__(self):
        return self.title

    # returns dictionary that can easily be jsonified
    def to_json(self):
        return {
                'title': self.title,
                'options': [{'name': option.option.name,
                            'vote_count': option.vote_count}
                            for option in self.options.all()],
                'close_date': self.close_date,
                'status': self.status,
                'total_vote_count': self.total_vote_count
            }
save the close_date in api_polls.
eta = datetime.utcfromtimestamp(poll['close_date'])
new_topic = Topics(title=title, options=options, close_date=eta)
Make sure you run the migrations before you proceed.
On the react side, we’ll have to modify LivePreviewProps render method to calculate the date
render: function(){
  var polls = this.props.polls.Polls.map(function(poll){

    var minutes = Math.floor((Date.parse(poll.close_date) - Date.now()) / (60000));
    var time_remaining = '';

    if(minutes > 1 && minutes < 59){
      time_remaining += minutes + ' minutes remaining';
    }

    else if(minutes < 1380){
      var hours =  Math.floor(minutes / 60);
      time_remaining += hours + ' hours remaining';
    }

    else {
      var days = Math.floor(minutes / (24 * 60));
      time_remaining += days + ' days remaining';
    }

    return (
      <LivePreview key={poll.title} title={poll.title} options={poll.options}
      total_vote_count={poll.total_vote_count} voteHandler={this.voteHandler}
      close_date={time_remaining} classContext={this.props.classContext} />
  );
}.bind(this));
and then we can display the date in LivePreview with:
// timeLeft style
var TimeLeft = {
  color: '#999',
  fontSize: '15px'
}


return(

  <div className={this.props.classContext}>
    <div className="panel panel-success">

      <div className="panel-heading">
        <h4>{this.props.title}</h4>

      </div>

      <div className="panel-body">
        <form onSubmit={this.voteHandler}>
          {options}
          <br />
          <button type="submit" disabled={this.state.disabled}
          className="btn btn-success btn-outline hvr-grow">Vote!</button>

          <small> {this.props.total_vote_count} votes so far</small>

          <small style={TimeLeft}> | {this.props.close_date}</small>

        </form>

      </div>

    </div>

  </div>
)
The poll form should show the time beside the vote count now

There is an important thing to note here: don’t put too much computation on the client side (though our date calculation should not cause any major slowdown), You want to keep your UI as fast as possible.
If you need to do heavy computation, you’re better off doing it on the server, or dispatching the task to celery to run in the background. Nobody likes a slow UI
We’ve come to the end of this part, you’ve learnt how to use celery to schedule background tasks and how to run those tasks at a later date.
If you’re still looking for some other things celery can help you achieve here are some examples on how a lot of companies use celery (or a similar solution) in production:
- Sending emails in the background when you register on their website
- Generating complex reports and graphs
- CSV export of a large dataset
In summary, you should use celery for any long-running user facing tasks you have in your application, so you don’t block or slowdown the UI and make your users unhappy.
Please read the celery docs to find out more about the advanced features of celery
I’ll also like to let you know about Flower which is a nice web app for monitoring your celery tasks in real time.
In the next part, we’re going to write some unit tests and discuss the importance of testing and code coverage.
untested code >= broken code
See you in the next part. Thanks for reading