Flask by example 11 (Deploying the application)
This is the last part of the series, we’re finally going to deploy the application so it can be visible to the whole world.
There are various ways to deploy web applications, they’re several things to consider like the technologies used to build the website, the target operating system, the expected number of users/load etc
We’re going to use Heroku
WHY HEROKU
Heroku is a Paas (Platform as a Service). Which simply means they offer you an environment to run your app without getting into the nitty-gritty of setting up a Linux server from scratch.
This might not be sufficient in some cases where you need full-control of your application’s enviroment. If that’s the case you should be looking at Companies that provide Iaas (Infrastructure as a Service), Like Digital Ocean, Amazon, Linode etc
I chose Heroku to run the application for various reasons:
- It's very easy to get started.
- It's tightly integrated with github and makes Deployment easy
- and it's Free!
LET’S GET STARTED
Obviously the first thing you have to do is create an account
After than you have to create a new Python application, i’ve named mine votr

I mentioned a tight integration with git earlier, so for the deployment we’re going to choose git, so once we make a git commit Heroku pull our new code and and apply the changes to the live app. There’s also an option of heroku-cli but that’s more manual. we want to push code to github and not bother ourselves about deployment.
So click on github and connect the votr repository, You’ll also see an option “Wait for CI to pass before deploy” you can safeley leave out that option.
Remember the tests we wrote in the previous part? This is where CI (Continuous integration) is useful. The major job of a CI server is to run those tests we wrote whenever new code is deployed (even if it’s a fullstop in a comment) and verify that our application is still working as expected. If any of the tests fail then heroku would not deploy the application as it would be deploying a broken version of the application.
Jenkins is the most popular CI server these days. But to run jenkins you’ll need your own hardware. Thankfully they’re also companies that provide Continuous Integration as a service. The most popular being Travis CI it’s also free (for open source projects) So make sure you check it out.
Don’t forget to click on the “Enable deployment” button
If you’re a bit curious and you click on deploy branch (Which by default is the master branch) You’ll see a warning that.
----> Python app detected*

Warning: Your application is missing a Procfile. This file tells Heroku how to run your application.*

Learn more: https://devcenter.heroku.com/articles/procfile*
The link in the error message contains more information about Procfiles
Before we eventually get to writing a Procfile, we have to make sure our application is production ready.
DON’T USE THE DEVELOPMENT SERVER
If you paid attention to the flask docs you’d have come across a section where it states Flask’s built-in server is not suitable for production as it doesn’t scale well and by default serves only one request at a time
So we need to another server to run our application. You may have heard of Apache, Nginx, IIS etc but those servers are written in other programming languages that are not python, so there’s no way for them to directly understand python and run our application. Which led to the creation of WSGI (Web Server Gateway Interface)
Before WSGI, One python application would work with a web server let’s say Apache and when you switch to another web server e.g Nginx it wouldn’t work. So WSGI came in as a interface/standard to solve this problem. Today once an application is WSGI Compatible (Thanks to the framework itself not you) it can be run any application server that’s WSGI compatible.
There are various WSGI servers for python. You can find them on WSGI.org In our case, we’re going to be using Gunicorn It’s popular, fast and is purely python based so it can easily be installed with
pip install gunicornAfter installing gunicorn, we have to give it a wsgi.py file that tells it about our application and how it’s going to run it.
create a new file called wsgi.py with the following content
from votr import votr as applicationThat’s all for a basic wsgi file. We just imported our application and exposed it as “application”
Now run gunicorn from the command line with
gunicorn wsgi:applicationIt should start the application now on http://127.0.0.1:8000 notice that we’re referring to our application object in wsgi:application If you had just imported votr you’d have run gunicorn like this
gunicorn wsgi:votrIf you stick with the application route, you can even run it without specifying the :application option with gunicorn wsgi
CREATE A PROCFILE
Now that we’ve got our application running on a capable web server, it’s time to create a Procfile, Like the wsgi.py file, the Procfile is very straight-forward.
create a new file named Procfile with the following contents.
web: gunicorn wsgi:application --log-file -That should tell heroku to run gunicorn when we eventually deploy. We’re also being specific with the logging (We’re logging to stdout). By default gunicorn logs to stdout if you don’t specify the --log-file option.
DEPLOY TO HEROKU
Since we developed the application in python3, it would make sense to also run on python3. Heroku defaults to Python2.7 (Gosh when is python 2 going to go away!) so create a runtime.txt file to tell heroku the version of python to use
python-3.6.2That’s all (For now). You can push to git and heroku should automatically build and deploy your application. That’s If you connected your app to github and configured the branch to be automatically deployed. If you’ve not You can set that up under the deployment tab or manually deploy the application from the web interface.
Yay! The application should be available now on yourapp.heroku.com
CELERY ON HEROKU
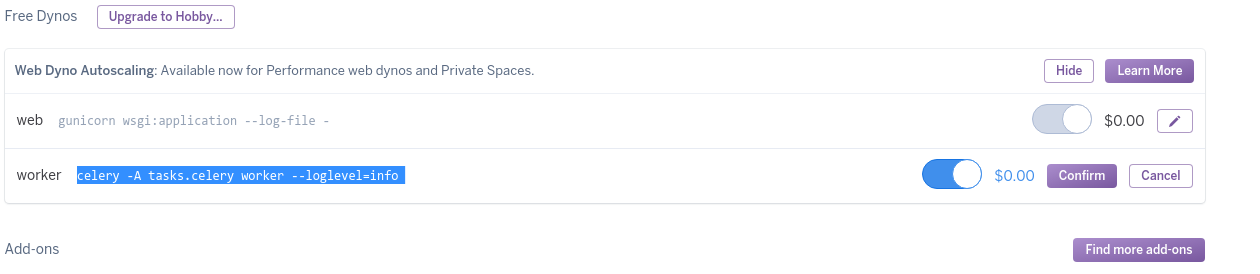
Heroku has support for celery and it’s as easy as adding a new entry to your Procfile, Edit your Procfile to match this
web: gunicorn wsgi:application --log-file -
worker: celery -A tasks.celery worker --loglevel=info
note the difference between the two processes, the first is a web process and the other is a background worker.
Finally you have to enable the worker from the UI under the “Resources” tab. Note that this can also be done through heroku cli.
RABBITMQ ON HEROKU
It’s available as an addon called rabbit-mq-bigwig. You just have to install/provision it. This can be done from the web interface or via heroku cli
We’re going to be adding it alongside postgres in the next section.
POSTGRES ON HEROKU
Everything seems to be running now, but we’re missing one last part which is the Database. SQLite is pretty okay if you don’t expect a lot of load on your site or it’s just a hobby site. But for a Real production site, You need a solid database to power it.
At the time of writing this article, heroku provisions a free database for each python application, the url for this database is contained in an environment variable called DATABASE_URL we just have to tell our application to use that database no unnecessary setup/installation. This is the main advantage of Heroku and other PaaS. The infrastructure is managed for you.
Create a new config file called production_config.py with the following content:
"""Production config for votr on Heroku."""

import os
from .config import *

DEBUG = False
SECRET_KEY = 'production key'  # keep secret
SQLALCHEMY_DATABASE_URI = os.getenv('DATABASE_URL')
CELERY_BROKER = os.getenv('RABBIT_BIGWIG_RX_URL')
The new config just imports values from the Debug configuration and overrides certain values that we need for production
To use the new config file Change the config section in votr.py to
# load config from the config file we created earlier
if os.getenv('APP_MODE') == "PRODUCTION":
    votr.config.from_object('config')
else:
    votr.config.from_object('production_settings')
Then in heroku set APP_MODE to PRODUCTION. (Under settings “Configuration Variables”)
That’s all for the application, Deploy again and you should see the application running on yourapp.heroku.com.
HEROKU CLI
Heroku offers a cli that you can use to interact with your application. The installation and usage is out of the scope of this tutorial because of the amount of options the cli has. But basically, it gives you full control over your application and provides some functionality that can’t be accessed via the web interface. A very good example of this is viewing logs of your application and running administrative tasks like Database backups and migrations. It also allows you access the heroku dyno directly so you can inspect the filesystem so it’s worth learning.
For more info checkout Heroku’s documentation
THAT’S A WRAP.
Well after 11 parts, we’ve come to the end of this tutorial on how to build an online polling application with Flask and React.
It took a lot of effort to complete this tutorial, but i hope you found it useful and learnt a lot of concepts from all the topics discussed. Personally i learned a lot myself especially on Celery and Heroku Deployments. (I now use Heroku for a couple side projects i have)
Though it took a lot of time (Literally forever) to release the last part of this series. I sincerely apologize but i was caught up with a lot of things, School, Work, Exploring other ideas but it feels good to finally push out an Article and i look forward to writing better articles on other technologies that i’m interested in.
Thanks for following along. If the knowledge gained from this series has inspired you to build something, i’ll love to hear about it in the comments section.