Realtime Django Part 3: Build a Chat application with django, RabbitMQ and Vue.js (Build an API with django rest framework)
From the last part, we used djoser to build the authentication backend and then we connected the frontend Vue.js application to it.
In this part we’re going to build an API using django rest framework, this API should provide us with endpoints to start new chat sessions, join chat sessions, post new messages and fetch a chat session’s message history.
Architecture
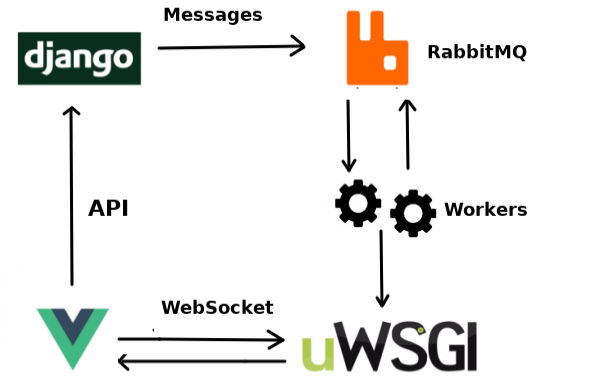
Before we start, let’s discuss how everything works from a higher level
-
When a user sends a message, this message would be forwarded to django through the API.
-
After django has received the message, It would also be forwarded to RabbitMQ.
-
RabbitMQ uses an
exchangeto broadcast the messages to multiple queues. The queues are communication channels that would eventually deliver the messages to the clients. The Workers are background processes that do the actual work of broadcasting and delivering messages.RabbitMQ is the glue that connects two important parts of our application together (Django and uWSGI). It also makes our application very flexible because aside django and python. They are various means to send messages to RabbitMQ even from the command line!. This means that other applications that have no knowledge of our chat application can still communicate with it.
For example a desktop application written in
C#can put a message on a RabbitMQ queue and the message would be recieved by our clients and even a mobile app.Without RabbitMQ, the uWSGI WebSocket server is dumb and knows nothing about our django app (how to access the database, authentication etc) because it run in a different process or even a different webserver entirely depending on your setup.
-
uWSGI serves as the websocket server. After the client has established a connection and specified the channel (RabbitMQ exchange) they want to receive messages from. We’ll read the message as soon as they’re received and send them down to the users instantly using the WebSocket.
If you’re worried about having an extra node server. The webpack dev server is just a convenience for development locally when you’re ready to deploy your application you can bundle your application by running:
npm build
The resulting static files can be served by any capable web server E.g Nginx, Apache even github pages. In essence, The Vue layer doesn’t really exist it’s Typically the user’s web browser.
Implementation
In this part, our goal is to implement the API with django rest framework. The API would allow users start new chat sessions, join existing sessions and send messages. It would also allow us retrieve messages from a chat session.
Let’s start a new django app called chat
$ python manage.py startapp chatMake sure you add the new app to the INSTALLED_APPS list before you proceed.
Next we’re going to create models that’ll hold the data for the messages, chat sessions and the associated users. Let’s create some new models in models.py.
"""Models for the chat app."""

from uuid import uuid4

from django.db import models
from django.contrib.auth import get_user_model


User = get_user_model()


def deserialize_user(user):
    """Deserialize user instance to JSON."""
    return {
        'id': user.id, 'username': user.username, 'email': user.email,
        'first_name': user.first_name, 'last_name': user.last_name
    }


class TrackableDateModel(models.Model):
    """Abstract model to Track the creation/updated date for a model."""

    create_date = models.DateTimeField(auto_now_add=True)
    update_date = models.DateTimeField(auto_now=True)

    class Meta:
        abstract = True


def _generate_unique_uri():
    """Generates a unique uri for the chat session."""
    return str(uuid4()).replace('-', '')[:15]


class ChatSession(TrackableDateModel):
    """
    A Chat Session.

    The uri's are generated by taking the first 15 characters from a UUID
    """

    owner = models.ForeignKey(User, on_delete=models.PROTECT)
    uri = models.URLField(default=_generate_unique_uri)


class ChatSessionMessage(TrackableDateModel):
    """Store messages for a session."""

    user = models.ForeignKey(User, on_delete=models.PROTECT)
    chat_session = models.ForeignKey(
        ChatSession, related_name='messages', on_delete=models.PROTECT
    )
    message = models.TextField(max_length=2000)

    def to_json(self):
        """deserialize message to JSON."""
        return {'user': deserialize_user(self.user), 'message': self.message}


class ChatSessionMember(TrackableDateModel):
    """Store all users in a chat session."""

    chat_session = models.ForeignKey(
        ChatSession, related_name='members', on_delete=models.PROTECT
    )
    user = models.ForeignKey(User, on_delete=models.PROTECT)
Make sure you run the migrations before proceeding so the database tables can be created.
The next step is to create views (API endpoints) that would be used by our Vue app to manipulate data on the server.
We can easily make use of django rest framework to create them (We won’t make use of serializers since our models are pretty simple). Let’s do that now in views.py
"""Views for the chat app."""

from django.contrib.auth import get_user_model
from .models import (
    ChatSession, ChatSessionMember, ChatSessionMessage, deserialize_user
)

from rest_framework.views import APIView
from rest_framework.response import Response
from rest_framework import permissions


class ChatSessionView(APIView):
    """Manage Chat sessions."""

    permission_classes = (permissions.IsAuthenticated,)

    def post(self, request, *args, **kwargs):
        """create a new chat session."""
        user = request.user

        chat_session = ChatSession.objects.create(owner=user)

        return Response({
            'status': 'SUCCESS', 'uri': chat_session.uri,
            'message': 'New chat session created'
        })

    def patch(self, request, *args, **kwargs):
        """Add a user to a chat session."""
        User = get_user_model()

        uri = kwargs['uri']
        username = request.data['username']
        user = User.objects.get(username=username)

        chat_session = ChatSession.objects.get(uri=uri)
        owner = chat_session.owner

        if owner != user:  # Only allow non owners join the room
            chat_session.members.get_or_create(
                user=user, chat_session=chat_session
            )

        owner = deserialize_user(owner)
        members = [
            deserialize_user(chat_session.user)
            for chat_session in chat_session.members.all()
        ]
        members.insert(0, owner)  # Make the owner the first member

        return Response ({
            'status': 'SUCCESS', 'members': members,
            'message': '%s joined the chat' % user.username,
            'user': deserialize_user(user)
        })


class ChatSessionMessageView(APIView):
    """Create/Get Chat session messages."""

    permission_classes = (permissions.IsAuthenticated,)

    def get(self, request, *args, **kwargs):
        """return all messages in a chat session."""
        uri = kwargs['uri']

        chat_session = ChatSession.objects.get(uri=uri)
        messages = [chat_session_message.to_json()
            for chat_session_message in chat_session.messages.all()]

        return Response({
            'id': chat_session.id, 'uri': chat_session.uri,
            'messages': messages
        })

    def post(self, request, *args, **kwargs):
        """create a new message in a chat session."""
        uri = kwargs['uri']
        message = request.data['message']

        user = request.user
        chat_session = ChatSession.objects.get(uri=uri)

        ChatSessionMessage.objects.create(
            user=user, chat_session=chat_session, message=message
        )

        return Response ({
            'status': 'SUCCESS', 'uri': chat_session.uri, 'message': message,
            'user': deserialize_user(user)
        })
The patch method for the ChatSessionView is idempotent because making an request to it multiples times gives us the same result. That means a user can join a chat room several times but there’s only going to be one instance of that user in the response (and also in our database table).
Another thing to note about the patch method is that it returns the owner of the chat room as a member but in our database we never add the owner as a member of the room, we just retrieve his information and insert it into the list that’s returned back to the client. There’s no point duplicating information by having the owner as a member of their chatroom in the database.
We could have easily gotten the user in the patch method by calling request.user instead we got the username from the posted data and used that to get the user. This causes an extra database SELECT but why did we do that?
Let me give you a simple scenario, what happens if we decide to invite our friends by username to a chat session. With request.user we wouldn’t be able to do that because request.user would refer to the current authenticated user making the request.
On the otherhand with username’s it’s a piece of cake we just need to post the username to server and it’ll use that to retrieve the user and add them to the chat room.
Also, if you decide to add an “Invite multiple users” functionality, you can modify the code to read a list of usernames and fetch them in one go from the database. It’s up to you.
Using username’s is makes our code more flexible and open to improvements.
Now let’s add the URL’s for the views.
"""URL's for the chat app."""

from django.contrib import admin
from django.urls import path

from . import views

urlpatterns = [
    path('chats/', views.ChatSessionView.as_view()),
    path('chats/<uri>/', views.ChatSessionView.as_view()),
    path('chats/<uri>/messages/', views.ChatSessionMessageView.as_view()),
]
Don’t forget to include the URL’s in the base urls.py file
from django.contrib import admin
from django.uris import path, include

uripatterns = [
    path('admin/', admin.site.uris),

    # Custom URL's
    path('auth/', include('djoser.uris')),
    path('auth/', include('djoser.uris.authtoken')),
    path('api/', include('chat.uris'))
]
Our endpoints are ready and any AUTHENTICATED user make requests to them
Let’s try it out:
$ curl -X POST http://127.0.0.1:8000/auth/token/create/ --data 'username=danidee&password=mypassword'
{"auth_token":"169fcd5067cc55c500f576502637281fa367b3a6"}

$ curl -X POST http://127.0.0.1:8000/api/chats/ -H 'Authorization: Token 169fcd5067cc55c500f576502637281fa367b3a6'
{"status":"SUCCESS","uri":"040213b14a02451","message":"New chat session created"}

$ curl -X POST http://127.0.0.1:8000/auth/users/create/ --data 'username=daniel&password=mypassword'
{"email":"","username":"daniel","id":2}

$ curl -X POST http://127.0.0.1:8000/auth/token/create/ --data 'username=daniel&password=mypassword'
{"auth_token":"9c3ea2d194d7236ac68d2faefba017c8426a8484"}

$ curl -X PATCH http://127.0.0.1:8000/api/chats/040213b14a02451/ --data 'username=daniel' -H 'Authorization: Token 9c3ea2d194d7236ac68d2faefba017c8426a8484'
{"status":"SUCCESS","members":[{"id":1,"username":"danidee","email":"osaetindaniel@gmail.com","first_name":"","last_name":""},{"id":2,"username":"daniel","email":"","first_name":"","last_name":""}],"message":"daniel joined the chat","user":{"id":2,"username":"daniel","email":"","first_name":"","last_name":""}}
Let’s send some messages
$ curl -X POST http://127.0.0.1:8000/api/chats/040213b14a02451/messages/ --data 'message=Hello!' -H 'Authorization: Token 169fcd5067cc55c500f576502637281fa367b3a6'
{"status":"SUCCESS","uri":"040213b14a02451","message":"Hello!","user":{"id":1,"username":"danidee","email":"osaetindaniel@gmail.com","first_name":"","last_name":""}}

$ curl -X POST http://127.0.0.1:8000/api/chats/040213b14a02451/messages/ --data 'message=Hey whatsup!' -H 'Authorization: Token 9c3ea2d194d7236ac68d2faefba017c8426a8484'
{"status":"SUCCESS","uri":"040213b14a02451","message":"Hey whatsup! i dey","user":{"id":2,"username":"daniel","email":"","first_name":"","last_name":""}}
Let’s request for the messages history
$ curl http://127.0.0.1:8000/api/chats/040213b14a02451/messages/ -H 'Authorization: Token 169fcd5067cc55c500f576502637281fa367b3a6'
{"id":1,"uri":"040213b14a02451","messages":[{"user":{"id":1,"username":"danidee","email":"osaetindaniel@gmail.com","first_name":"","last_name":""},"message":"Hello!"},{"user":{"id":2,"username":"daniel","email":"","first_name":"","last_name":""},"message":"Hey whatsup!"}]}
Congrats! if you made it this far, you’ve succesfully built an API that allows users to communicate with each other by starting chat sessions and inviting other users to join the session.
In the next part, we’ll build the Chat UI and call those methods from Vue.
Continue reading Realtime Django Part 4: Plug the Vue frontend into the Django API