Realtime Django Part 5: Build a Chat application RabbitMQ and uWSGI websockets (uWSGI WebSockets)
Welcome to the penultimate part of this tutorial. I’ve really learnt a lot writing this tutorial and i hope you have too.
In part 4, we were able to acheive our main goal of the tutorial which was to build a web based chat application with django and Vue. But we faced a major issue with scaling the application.
WebSockets
From the last tutorial, we went through a little primer on WebSockets. we know they’re bi-directional connections that stay open and allow the server to communicate instantly with the client and vice-versa.
Django itself was developed at a different time in our internet history. Back then Websites/Web applications weren’t as sophisticated as they are today. It was basically “Hey i want the articles from the 1st of January 2005” and then the server goes “Don’t worry bro I got you” and does some work fetching the articles and then responds “Here are the articles you asked for” and then it goes back to sleep or attend to other users (Closes the socket). You couldn’t receive information without asking for it. For example the Web Server couldn’t say “Someone in Lagos sent you a message here is the message”. You’ll need to ask the Web server. “Please let me see all my unread messages”.
Don’t mind these stupid examples :-). what we can draw from this is that the communication could only be initiated from one person (The client).
This was really a problem for Django and a lot of python web frameworks because the underlying protocol that governs how python applications should run (WSGI) was tied down to this request-response pattern of communication.
So many people approached the problem from different angles
- By new frameworks/web servers (E.g Twisted, Tornado).
- Async engines with websocket servers (E.g gevent)
- By Adding support to existing WSGI Servers (
uWSGI)
modifying django directly was going to be difficult because it was going to require some drastic changes in the core of django due to it’s synchronous nature and the WSGI protocol itself.
django channels
Andrew Godwin brought websockets to django natively with django-channels. At the time this tutorial was written it’s currently an official project of the django software foundation. Meaning it’s not going anywhere soon.
django-channels introduces a new protocol called ASGI that’s distinctly different from WSGI. django-channels comes with it’s own web server called Daphne. Daphne can handle regular http connections and WebSocket connections.
If you decide to go with django-channels you have to learn it’s API and methods, You’ll also need to change your deployment process.
To scale to horizontally to multiple machines you’ll still need to make use of a what django-channels call Channel layers. The recommended layer is the Redis layer. There’s also a RabbitMQ channel layer and an IPC (Inter pocess Communication) Layer. These Channel layers are the glue between django and the Daphne server. The Redis and RabbitMQ in particular are used to scale channels horizontally. The IPC channel layer is quicker but it’s only suitable for a single server because all the processes use a shared memory for communication.
There’s also some downsides to using the Redis channel. Redis doesn’t have TLS Support natively and it’s support for Persistent queues isn’t that great compared to RabbitMQ.
Also, Due to the ASGI Specification, django-channels emulates Pub/Sub (It doesn’t actually use the Pub/Sub capabilities of Redis or RabbitMQ) which isn’t great if you need to listen directly on a channel.
At the end of the day, we’re going to build a similar system to django-channels. More like a “poor man’s” django-channels but on a lower level. We’re going to read from RabbitMQ queues directly. (django-channels abstracts this into Groups). uWSGI would take a similar role as the Daphne server.
The Difference is our approach doesn’t limit us to a single WebSocket server like django-channels. You can easily replace uWSGI with another WebSocket server with minimal work.
There are ongoing plans for django-channels to support other “Interface” aside Daphne.
uWSGI WebSockets
unbit (The developers of uWSGI) took a different approach, they decided to integrate WebSockets into the uWSGI Core itslf. uWSGI is a very performant WSGI Web server for python. It’s Arguably the most popular python WSGI Server. It also supports several programming languages like Perl, Ruby even Go.
If you currently use uWSGI in your stack and you need WebSockets, you don’t need to change anything. Even if you use a different WSGI Server like gunicorn you just need to pip install uwsgi it’s that simple.
If you remember the discussion we had earlier in part 3 about RabbitMQ. Remember i told you RabbitMQ is the glue between uWSGI and django.
We need to create notifications and put them on the RabbitMQ Queue and then through the websockets this messages can be broadcasted directly to multiple users.
To ease the process of creating notifications and sending them to RabbitMQ, i created a third party django library called django-notifs.
It’s available on Pypi.
pip install django-notifsMake sure you add to your INSTALLED_APPS:
INSTALLED_APPS = (
    'django.contrib.auth',
    ...,
    'rest_framework',
    'rest_framework.authtoken',
    'djoser',

    # Our apps
    'chat',
    'notifications'
)
Installing django-notifs also installs pika which is a python library for connecting to RabbitMQ.
Run the migrations with python manage.py migrate
Finally install RabbitMQ The instructions vary for different operating systems, so head on to the installation guide to get the installation instructions for your Operating system.
Before you continue, Make sure the RabbitMQ server is running, if not you’ll get errors when you try to connect to it from pika.
open views.py and update the ChatSessionMessageView view:
from notifications.signals import notify


class ChatSessionMessageView(APIView):
    ...

    def post(self, request, *args, **kwargs):
        """create a new message in a chat session."""
        uri = kwargs['uri']
        message = request.data['message']

        user = request.user
        chat_session = ChatSession.objects.get(uri=uri)

        chat_session_message = ChatSessionMessage.objects.create(
            user=user, chat_session=chat_session, message=message
        )

        notif_args = {
            'source': user,
            'source_display_name': user.get_full_name(),
            'category': 'chat', 'action': 'Sent',
            'obj': chat_session_message.id,
            'short_description': 'You a new message', 'silent': True,
            'extra_data': {'uri': chat_session.uri}
        }
        notify.send(
            sender=self.__class__, **notif_args, channels=['websocket']
        )

        return Response ({
            'status': 'SUCCESS', 'uri': chat_session.uri, 'message': message,
            'user': deserialize_user(user)
        })
Just before we return a response to the user, we send the notify signal with arguments, Most of the arguments are self explanatory.
The silent parameter means the notification won’t be persisted to the database. In other words, we’re using django-notifs like event emitter. You can also pass arbitrary notification data in the extra_data argument as a dictionary.
Notification channels
django-notifs makes use of channels to deliver messages. This means that you can write your own custom channel to deliver messages via emails, SMS, Slack and anything you can think of. It even comes with an inbuilt websocket channel but that won’t suffice for our case because it’s a user to user channel.
We want to broadcast messages to multiple clients at the same. This pattern of communication is called Pub/Sub (Publish Subscribe) and RabbitMQ has support for this as exchanges.
An exchange is a channel that receives messages from a producer (Our application) and then broadcasts it to multiple queues. There are four different types of exchanges namely direct, topic, headers and fanout. We’ll make use of the fanout exchange it’s the simplest to understand and fits our use case perfectly.
This is an illustration from the RabbitMQ docs on how the fanout exchange works:

Before a queue can receive a message it has to be bound to the exchange.
To implement the Pub/Sub pattern we’ll need to write our own delivery channel.
It’s quite simple. Create a new file called channels.py
"""Notification channels for django-notifs."""

from json import dumps

import pika

from notifications.channels import BaseNotificationChannel


class BroadCastWebSocketChannel(BaseNotificationChannel):
    """Fanout notification channel with RabbitMQ."""

    def _connect(self):
        """Connect to the RabbitMQ server."""
        connection = pika.BlockingConnection(
            pika.ConnectionParameters(host='localhost')
        )
        channel = connection.channel()

        return connection, channel

    def construct_message(self):
        """Construct the message to be sent."""
        extra_data = self.notification_kwargs['extra_data']

        return dumps(extra_data['message'])

    def notify(self, message):
        """put the message of the RabbitMQ queue."""
        connection, channel = self._connect()

        uri = self.notification_kwargs['extra_data']['uri']

        channel.exchange_declare(exchange=uri, exchange_type='fanout')
        channel.basic_publish(exchange=uri, routing_key='', body=message)

        connection.close()
We set the exchange name as the uri of the chat session.
We also dumped the chat message as a dictionary. We’ll need all the details about the message on the client side not just the actual message.
You need to tell django-notifs about the new channel you just created. In your application settings include the following:
# Celery settings
CELERY_TASK_ALWAYS_EAGER = True

# notifications settings
NOTIFICATIONS_CHANNELS = {
   'websocket': 'chat.channels.BroadCastWebSocketChannel'
}
This tells it to use forward notifications to our websocket channel which handles the logic for sending messages to RabbitMQ.
django-notifs uses Celery to process notifications asynchronously so long running notification tasks (Like sending emails) don’t block the user’s request.
Inside the chatire folder, create a new file called celery.py and include the following:
"""Celery init."""

from __future__ import absolute_import, unicode_literals
import os

from celery import Celery


# set the default Django settings module for the 'celery' program.
os.environ.setdefault('DJANGO_SETTINGS_MODULE', 'chatire.settings')

app = Celery('chatire')
app.config_from_object('django.conf:settings', namespace='CELERY')

app.autodiscover_tasks()
The app.autodiscover_tasks() line is very important. It automatically locates and imports the celery tasks defined in django-notifs without it, you’ll have to import the task manually.
In __init__.py include this:
"""Initialize celery."""

from __future__ import absolute_import, unicode_literals

from .celery import app as celery_app

__all__ = ['celery_app']
This imports the app object we created in celery.py as celery_app once the app is loaded.
Because we set CELERY_TASK_ALWAYS_EAGER to True in settings.py we should be able to send messages Synchronously without a Celery worker. If you want the asynchronous behaviour (Which i highly recommend) set CELERY_TASK_ALWAYS_EAGER to False or Omit it entirely and start a celery worker with:
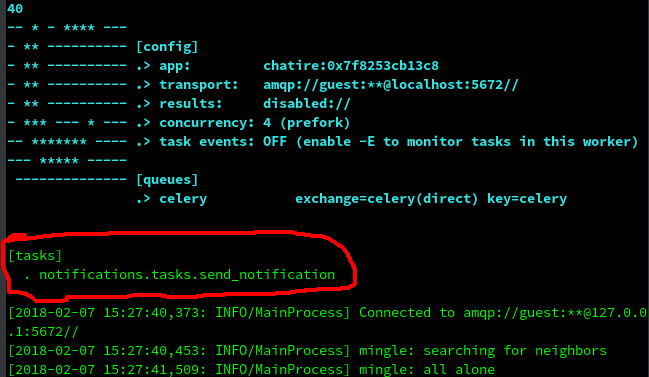
celery -A chatire worker -l infoMake sure you see the task from django-notifs listed under [tasks]
Try and send a message through the Chat UI. A new RabbitMQ exhange based on the uri for the chat session should be created.
To see the list of exchanges we have (for *nix systems) run this in the terminal:
rabbitmqctl list_exchanges
Listing exchanges
amq.match	headers
amq.direct	direct
amq.rabbitmq.log	topic
amq.rabbitmq.trace	topic
amq.topic	topic
	direct
amq.fanout	fanout
amq.headers	headers
fe662fd9de834fc	fanout  # our Exchange
You can also see some inbuilt exchanges.
Now we’re going to dynamically create queues and bind them to the exchange we created earlier so they can receive messages.
Create a new file called websocket.py.
"""Receive messages over from RabbitMQ and send them over the websocket."""

import pika


connection = pika.BlockingConnection(
    pika.ConnectionParameters(host='localhost')
)
channel = connection.channel()

channel.exchange_declare(
    exchange='fe662fd9de834fc', exchange_type='fanout'
)

# exclusive means the queue should be deleted once the connection is closed
result = channel.queue_declare(exclusive=True)
queue_name = result.method.queue  # random queue name generated by RabbitMQ

channel.queue_bind(exchange='fe662fd9de834fc', queue=queue_name)

print('listening for messages...')

while True:
    for method_frame, _, body in channel.consume(queue_name):
        try:
            print(body)
        except OSError as error:
            print(error)
        else:
            # acknowledge the message
            channel.basic_ack(method_frame.delivery_tag)
Once again, after connecting to RabbitMQ using pika we declared the exchange.
Declaring an exchange (or queue) multiple times has no adverse effects, If the exchange didn’t exist beforehand RabbitMQ creates it else it does nothing.
Let’s take a closer look at this line:
channel.queue_bind(exchange='fe662fd9de834fc', queue=queue_name)
This binds the queue to the exchange. It’s more like “Hey exchange, i’m interested in the messages you receive. Please send them to me.”
The queue_name is generated randomly by RabbitMQ because we called queue_declare without passing in a name.
There are different ways of consuming messages off a channel. You can use callbacks or consume manually with a for loop. we went with the second option so we can gracefully handle exceptions that might occur when we try to send the message down to the client. This will make more sense when we finally implement the WebSocket.
channel.basic_ack(method_frame.delivery_tag) acknowledges that the client succesfully received the message and it can be removed from the queue. If a message is not acknowledged it would remain on the queue until the queue itself is deleted.
For more info about method frames and the different types of frames check out the RabbitMQ docs.
Go ahead and start the run the websocket file with:
$ python websocket.py
listening for messages...
Now go back to the chat UI and send some messages. I sent "hello world" and "how are you doing" and this was the output.
listening for messages...
b'{"user": {"id": 1, "username": "danidee", "email": "", "first_name": "", "last_name": ""}, "message": "Hello world"}'
b'{"user": {"id": 12, "username": "daniel", "email": "", "first_name": "", "last_name": ""}, "message": "How are you doing"}'
Open up a new terminal, run the websocket file and send more messages from the chat UI. You should still be able to see the new messages.
Nice work! Now there’s only one thing left and that’s sending the messages directly to the user.
Where is the websocket?
The websockets are included in the core uwsgi python object. First of all install uWSGI if you haven’t already.
$ pip install uwsgiWe’re going to make some modifications to the websocket.py file
"""Receive messages over from RabbitMQ and send them over the websocket."""

import sys

import pika
import uwsgi


def application(env, start_response):
    """Setup the Websocket Server and read messages off the queue."""
    connection = pika.BlockingConnection(
    pika.ConnectionParameters(host='localhost')
    )
    channel = connection.channel()

    exchange = env['PATH_INFO'].replace('/', '')

    channel.exchange_declare(
        exchange=exchange, exchange_type='fanout'
    )

    # exclusive means the queue should be deleted once the connection is closed
    result = channel.queue_declare(exclusive=True)
    queue_name = result.method.queue  # random queue name generated by RabbitMQ

    channel.queue_bind(exchange=exchange, queue=queue_name)

    uwsgi.websocket_handshake(
        env['HTTP_SEC_WEBSOCKET_KEY'],
        env.get('HTTP_ORIGIN', '')
    )

    def keepalive():
        """Keep the websocket connection alive (called every 30 seconds)."""
        print('PING/PONG...')
        try:
            uwsgi.websocket_recv_nb()
            connection.add_timeout(30, keepalive)
        except OSError as error:
            connection.close()
            print(error)
            sys.exit(1)  # Kill process and force uWSGI to Respawn

    keepalive()

    while True:
        for method_frame, _, body in channel.consume(queue_name):
            try:
                uwsgi.websocket_send(body)
            except OSError as error:
                print(error)
                sys.exit(1)  # Force uWSGI to Respawn
            else:
                # acknowledge the message
                channel.basic_ack(method_frame.delivery_tag)
The uwsgi websocket api is very simple. We’re using just three methods:
-
uwsgi.websocket_handshake: The handshake is the bridge from HTTP to WS protocol. This method establishes tries to connect the client and the server together, if it fails for any reason an exception would be raised.
-
uwsgi.websocket_recv_nb: This method is actually deceptive and misleading (Really i’m serious) because even though the full name is
websocket receive non blockingit doesn’t only receive messages in a non-blocking manner it also helps to maintain the connection with the client by sending apongto the browser. (heartbeat mechanicsm to check if the client is still alive)The keep alive function calls this method every 30 seconds, without that the client might disconnect the connection (Typically after a minute of inactivity) if it doesn’t hear from the server.
-
uwsgi.websocket_send: You don’t need a sooth-sayer to tell you about this one :-) Though the reason we need the error handler, is in case the connection is closed and we try to send a message
uwsgi.websocket_sendwould raise anOSError. We’ll close the connection to RabbitMQ and kill the process.uWSGIwill take care of restarting it for us. Also, theelseblock would never run which means we won’t acknowledge the message and it would stay on the queue.The next time we enter the for loop and call
channel.consumewould send the unacknowledged message plus any new messages in the queue. Which means we’ll never miss any message due to network connectivity.
Did you notice that the exchange uri is no longer hardcoded? Instead we get the exchange name from the connection URL which would require our clients to connect to a URL like this:
http://websocket-server/<uri>
Don’t worry if this doesn’t make any sense to you when we finally connect our Vue frontend to the WebSocket server it’ll clear a lot of things up.
Connecting to the WebSocket with JavaScript
It’s impossible to talk about WebSockets in the context of a web application without JavaScript. Most modern browsers already support WebSockets so we don’t need to install any polyfill.
Let’s update the Chat component
<script>
const $ = window.jQuery

export default {
  ...

  created () {
    this.username = sessionStorage.getItem('username')

    // Setup headers for all requests
    $.ajaxSetup({
      beforeSend: function(xhr) {
        xhr.setRequestHeader('Authorization', `JWT ${sessionStorage.getItem('authToken')}`)
      }
    })

    if (this.$route.params.uri) {
      this.joinChatSession()
    }

    this.connectToWebSocket()
  },

  methods: {
    ...

    postMessage (event) {
      const data = {message: this.message}

      $.post(`http://localhost:8000/api/chats/${this.$route.params.uri}/messages/`, data, (data) => {
        this.message = '' // clear the message after sending
      })
      .fail((response) => {
        alert(response.responseText)
      })
    },

    joinChatSession () {
      ...
    },

    fetchChatSessionHistory () {
     ...
    },

    connectToWebSocket () {
      const websocket = new WebSocket(`ws://localhost:8081/${this.$route.params.uri}`)
      websocket.onopen = this.onOpen
      websocket.onclose = this.onClose
      websocket.onmessage = this.onMessage
      websocket.onerror = this.onError
    },

    onOpen (event) {
      console.log('Connection opened.', event.data)
    },

    onClose (event) {
      console.log('Connection closed.', event.data)

      // Try and Reconnect after five seconds
      setTimeout(this.connectToWebSocket, 5000)
    },

    onMessage (event) {
      const message = JSON.parse(event.data)
      this.messages.push(message)
    },

    onError (event) {
      alert('An error occured:', event.data)
    }
  }
}
</script>
Now start the uWSGI WebSocket Server on port 8081 and reload the browser.
$ uwsgi --http :8081 --module websocket --master --processes 4Hooray!
You should be able to send messages and see them appear in realtime.

There’s still a problem. open 3 more tabs (5 active clients). The last client wouldn’t be able to connect because the 4 processes we specified are tied down by other clients.
NOTE: That’s a reason why we need to kill stuck processes immediately with sys.exit(1) because the process may not really be stuck, the user might have intentionally left the chat room and it would take uWSGI sometime to figure out that the client has disconnected before closing the connection on the server.
The –master option invokes the master process which monitors dead processes and restarts them without this, the process would die and never be restarted and it would continue until the last process dies and uWSGI exits.
so why is this happening?
I thought you said WebSockets Scale
Yes I said that. The reason our current setup won’t scale is simply because of the way we’re running uWSGI; with processes and threads like a normal python WSGI server runs.
An Easy solution would be to increase the processes but that can only take us to probably a few hundred users or less depending on your server’s resources.
Asynchronous IO and Concurrency
Asynchronous IO deserves an entire article on it’s own. If you don’t have the slightest idea about what it is i’ll advice you to go crazy on google and read every article you can find.
Basically the idea behind AsyncIO or simply async is when we have multiple IO bound tasks that we need to run. During the said IO operation (In our case, sending and receiving messages), instead of the process sitting idle waiting for the new messages, it can quickly switch to another IO bound task and run it.
This Simple concept (high level explanation) is what makes NodeJS excel so much for IO bound applications.
For python and uWSGI things are a little different because they are not asynchronous by design. There are several async libraries for python. The Official asyncio, gevent, curio etc. uWSGI itself supports some of these libraries asyncio being one of them but we’re going to use gevent.
From my experience, I found gevent works better compared to asyncio and uGreen. Gevent also has a lot of useful methods. For example monkey.patch_all which replaces most of the standard library with gevent’s libraries and allows you write synchronous code that’s executes asynchronously.
Install gevent with pip.
$ pip install geventNow you just need to start the uWSGI WebSocket Server like this:
$ uwsgi --http :8081 --gevent 2 --module websocket --gevent-monkey-patch --masterFirst we’re starting with 2 gevent threads and a single process, that means we can only handle two clients reasonably (it flunctuates between 3 and 4 clients randomly but most times only 2 clients receive messages reliably), when more clients try to join in you’ll get a warning in the uWSGI saying:
async queue is full !!!There are two ways you can scale up, the easiest way is to increase the number of gevent threads (Actually greenlets) that are run. If we change the uWSGI startup code to this
$ uwsgi --http :8081 --gevent 100 --module websocket --gevent-monkey-patch --masterBoom! just like that we can handle 100 concurrent users.
What about having multiple processes?
That’s the second way of scaling up, you can have multiple processes let’s start the uWSGI server with 4 processes
$ uwsgi --http :8081 --gevent 100 --module websocket --gevent-monkey-patch --master --processes 44 processes * 100 –gevent threads that’s 400 Concurrent users already!
Depending on your server’s specs and configuration you can increase the number of processes and gevent threads but before doing this make sure you profile and monitor your application’s performance because at a certain stage increasing numbers will cause degraded performance.
uWSGI features a python package (installable from pip) called uwsgitop that can be used for monitoring it. But that’s out of the scope of this tutorial. Maybe i’ll write about it in the future.
Scaling out to multiple servers
At a certain point, we’ll max out our server’s resources and we’ll need to scale out to multiple servers. Since our websocket server isn’t coupled to our main django application. That’s fairly easy because we can load balance multiple servers (Each running multiple uWSGI processes and gevent threads) behind Nginx.
And before you know it, you’ll be handling thousands of connections easily.
You can also apply the same clustering and loadbalancing technique to RabbitMQ when you need to scale out (though not with Nginx since RabbitMQ doesn’t use HTTP). Take a look at the documentation https://www.rabbitmq.com/ha.html
Well well well…that’s all for this tutorial i hope you’ve accquired some new skills as you tagged along.
As a bonus, i’m going to make one last part containing a lot of improvements to chatire. Most of this improvements and features would have been added without derailing the tutorial.
Below are the things i’ll cover in the next part:
Frontend
Implementing a loading screen. Before we determine if we should join a chat session or not.
Automatically scrolling to the bottom of the screen when messages exceed the window height.
Play sounds when the notification window is not focused.
Backend
JSON tokens with djsoer.
Thanks for reading If you’ve enjoyed this tutorial please acknowledge it starring the repo, dropping a comment or following me on twitter twitter
You can also send a mail
The Feedback really means a lot to me.